 KeePass Help Center KeePass Help Center
|
 KeePass Home | KeePass Home |
 Downloads | Downloads |
 Translations | Translations |
 Plugins | Plugins |
 Donate Donate  Help Center Home | Help Center Home |
 Forums | Forums |
 Awards | Awards |
 Links Links |
 |
Trigger ExamplesExamples of how to use the trigger system. |
[Documentation contributed by Paul Tannard]
- General information
- Triggers:
- Miscellaneous triggers:
 General information
Importing triggers from a file.
Some triggers on this page are offered as files.
In order to import these, do the following:
- Open the file containing the trigger(s) to be imported in a viewer/editor (e.g. in a new tab of your browser).
- Select the entire XML text – usually pressing Ctrl+A will do this.
- Copy the text to the clipboard.
- Open KeePass and navigate to 'Tools' → 'Triggers...'.
- Click the 'Tools' button and select 'Paste Triggers from Clipboard'.
- Edit the triggers as required.
Back up your database when you open KeePass
- Open KeePass and navigate to 'Tools' → 'Triggers...'.
- Add a trigger.
- Call it something meaningful, like "Back up database on open".
- Tick the 'Enabled' and 'Initially on' boxes.
- Navigate to the 'Events' tab and add an event.
- Select 'Opened database file'. Don't bother with the comparison or filter.
- Navigate to the 'Actions' tab and add an action.
- Select 'Execute command line / URL'.
- In the 'File/URL' field enter this:
%comspec% - In the 'Arguments' field enter this:
/c copy "{DB_PATH}" "C:\Backup\{DB_BASENAME}.{DT_SIMPLE}"
KeePass will now back up all databases when opening them.
How it works.
KeePass runs the command specified and replaces the placeholders as
shown:
{DB_PATH}= the full path and name of the opened database.{DB_BASENAME}= the first part of the database name only, e.g. "Database.kdbx" would become "Database".{DT_SIMPLE}= YYYYMMDDHHMMSS.
If your database was on drive E: and was called MyDB.kdbx, this is what
you get as a command line:
%comspec% /c copy "E:\MyDB.kdbx" "C:\Backup\MyDB.20090626"
If you want to save the database to a different location, change the
'C:\Backup' to the correct location.
Note: this command will fail if the location you specify does not exist.
USB key.
If you have your database on a USB key and use it on many machines, you
don't want to leave a backup on the hard disk.
You need to back up your database to the USB key before you save any
changes.
- In the 'Arguments' field enter this:
/c copy "{DB_PATH}" "{DB_DIR}\{DB_BASENAME}.{DT_SIMPLE}"
How it works.
KeePass runs the command specified and replaces the placeholders as shown:
{DB_DIR}= the full path of the opened database.{DB_BASENAME}= the first part of the database name only, e.g. "Database.kdbx" would become "Database".{DT_SIMPLE}= YYYYMMDDHHMMSS.
Keep only the most recent 3 or 5 or 7 backups.
- Add another 'Execute command line / URL' action.
- In the 'File/URL' field enter this:
%comspec% - In the 'Arguments' field enter this:
/c for /f "skip=7 tokens=*" %X in ('dir "C:\Backup\{DB_BASENAME}.*" /b
/o:-d') do del "C:\Backup\%X"
How it works.
This performs a "dir" in reverse date order on the backup files,
skips the most recent 7 items and deletes the rest. The path and file name
are quoted in case you have spaces in there.
Note: you need to set the the path in 2 places so that it matches your
backup location.
Using PowerShell instead of Cmd.exe.
- In the 'File/URL' field enter this:
PowerShell.exe - In the 'Arguments' field enter this:
-Command Copy-Item "{DB_PATH}" "C:\Backup\{DB_BASENAME}.{DT_SIMPLE}" - Add another 'Execute command line / URL' action.
- In the 'File/URL' field enter this:
PowerShell.exe - In the 'Arguments' field enter this:
-Command Get-ChildItem "C:\Backup\{DB_BASENAME}.*" |
Sort-Object LastWriteTime -Descending | select -Skip 7 | Remove-Item
Export to a different format when you save
- Open KeePass and navigate to 'Tools' → 'Triggers...'.
- Add a trigger.
- Call it something meaningful, like "Export database on save".
- Tick the 'Enabled' and 'Initially on' boxes.
- Navigate to the 'Events' tab and add an event.
- Select 'Saved database file'. Don't bother with the comparison or filter.
- Navigate to the 'Actions' tab and add an action.
- Select 'Export active database'.
- In the 'File/URL' field a full path, file name and extension, e.g.
C:\Export\Database.txt - In the 'File format' field enter the required format. See format names
below.
Note: format names must be exact.
KeePass will now export the current database after it has been saved.
Format names.
- Version 1 database format (uses the same password/key as the existing database): KeePass KDB (1.x)
- Version 2 database format (uses the same password/key as the existing database): KeePass KDBX (2.x)
- Version 1 CSV format: KeePass CSV (1.x)
- Version 2 XML format: KeePass XML (2.x)
- For more format names, see the import/export dialog.
Auditing KeePass changes
Should the auditors be on your case - aren't they always - you can set up a trigger to log changes to the KeePass database. This will not list the specific changes, but it does show who made the changes and when. If you also save copies of the changed database, you can view the modified time attribute to see what was changed.
- Open KeePass and navigate to 'Tools' → 'Triggers'.
- Add a trigger.
- Call it something meaningful, like "Auditors do it because it annoys you".
- Tick the 'Enabled' and 'Initially on' boxes.
- Navigate to the 'Events' tab and add an event.
- Select 'Saved database file'. Don't bother with the comparison or filter.
- Navigate to the 'Actions' tab and add an action.
- Select 'Execute command line / URL'.
- In the 'File/URL' field enter this:
%comspec% - In the 'Arguments' field enter this:
/c echo DBS change on %DATE% %TIME% by %USERDNSDOMAIN% %USERDOMAIN% %USERNAME% >> "\\servername\share\directory\KpLogRecord.txt" - Add another action.
- Select 'Execute command line / URL'.
- In the 'File/URL' field enter this:
%comspec% - In the 'Arguments' field enter this:
/c copy "{DB_PATH}"
"\\servername\share\directory\{DB_BASENAME}.{DT_SIMPLE}"
To be sure the audit logs are retained, set up
"\\servername\share\directory" with only write permission.
How it works.
KeePass runs the command specified and replaces the placeholders as
shown:
%DATE%= the current date.%TIME%= the current time.%USERDNSDOMAIN%= the logon domain of the current user, if they are in a domain.%USERDOMAIN%= the logon machine/domain of the current user.%USERNAME%= the logon name of the current user.
This information is appended to the log file KpLogRecord.txt.
The second action copies the saved database to the audit location and
appends the date and time.
See also: KeeModifiedBy plugin.
Preventing infinite loops
KeePass can fall into an infinite loop if an action re-triggers itself, e.g. a save triggering a sync event will loop because the sync is classed as a save. To prevent this you need to disable the trigger whilst your event is running, then re-enable the trigger.
- Open KeePass and navigate to 'Tools' → 'Triggers...'.
- Edit your existing trigger.
- Navigate to the 'Action' tab and add a new action.
- Select 'Change trigger on/off state'.
- Leave the 'Trigger name' field empty (this way the action applies to the currently running trigger).
- In the 'New state' field change the state to 'off'.
- Click 'OK' to save the action.
- Highlight the new action and move it to the top of the 'Actions' list by clicking on the 'up arrow' on the right.
- Add a new action.
- Select 'Change trigger on/off state'.
- Leave the 'Trigger name' field empty.
- In the 'New state' field change the state to 'on'.
- Click 'OK' to save the action.
- Make sure the action is at the bottom of the 'Actions' list.
- Save the event.
KeePass will now disable the trigger whilst the actions are performed.
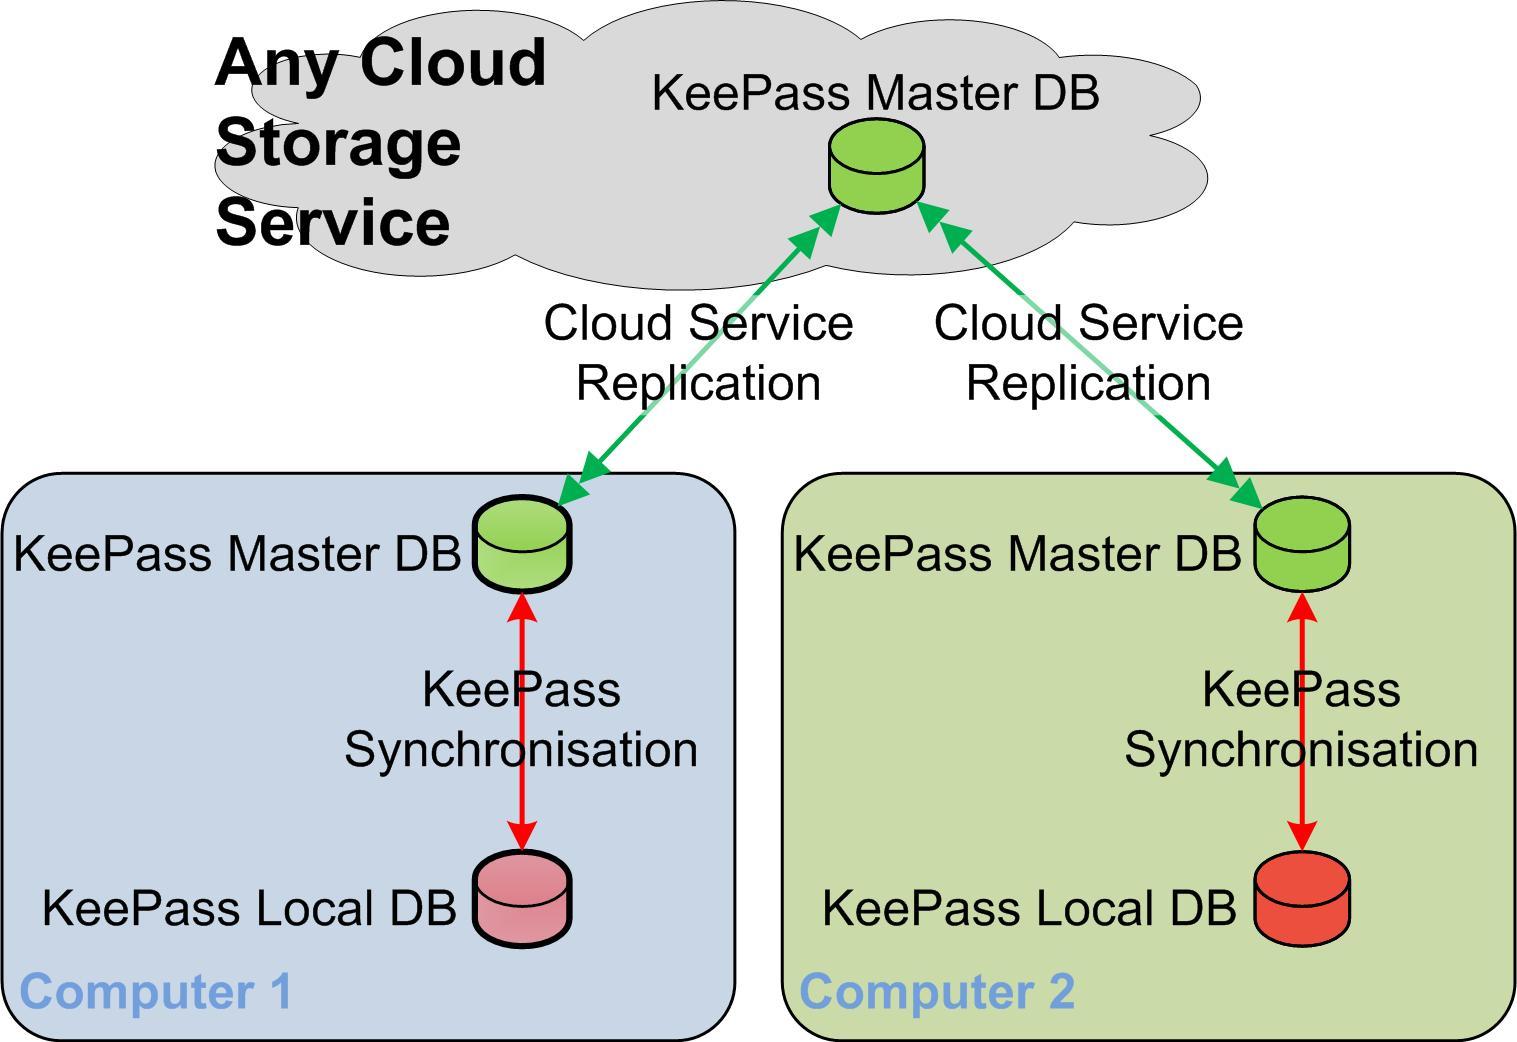
Synchronizing with Dropbox / other PC synchronization software
Dropbox will synchronize files between computers, but it can't determine what changes KeePass has made, only that the database has changed. To ensure that KeePass changes are not lost by Dropbox, you need to use a second copy of the database that is just for the Dropbox synchronization. Then use a KeePass trigger to move changes between KeePass and Dropbox.
- The database you currently use in KeePass must be stored outside the Dropbox
directory, e.g.
Documents\KeePass\Database.kdbx
If this is not the case, move the database and then re-open it in KeePass. - Create a new directory to use for the Dropbox synchronization, e.g.
Documents\Dropbox\KeePassSync
Note: Do not use the current database location, you must have 2 copies of the database. - Copy (do not move) the KeePass database you want to sync to the new directory.
- Open KeePass and navigate to 'Tools' → 'Triggers...'.
- Add a trigger.
- Call it something meaningful, like "Prevent data loss by Dropbox".
- Navigate to the 'Events' tab and add an event.
- Select 'Saved database file'.
- If you only want to sync a certain database, set the 'File/URL - Comparison'
to 'Equals' and the 'File/URL - Filter' field to the required
database file path. Otherwise don't change the fields.
Note: To make the trigger portable, use the environment variable %USERPROFILE% in the file path, e.g.%USERPROFILE%\Documents\KeePass\Database.kdbx - Navigate to the 'Action' tab and add a new action.
- Select 'Change trigger on/off state'.
- Leave the 'Trigger name' field empty.
- In the 'New state' field change the state to 'Off'.
- Click 'OK' to save the action.
- Add a new action.
- Select 'Synchronize active database with a file/URL'.
- Enter the full path and name of your copy of the KeePass database in the
'File/URL' field, e.g.
%USERPROFILE%\Documents\Dropbox\KeePassSync\Database.kdbx - Click 'OK' to save the action.
- Add a new action.
- Select 'Change trigger on/off state'.
- Leave the 'Trigger name' field empty.
- In the 'New state' field change the state to 'On'.
- Click 'OK' to save the action.
- Save the event.
- Perform these steps on all PCs that you will sync with Dropbox.
This trigger can also be imported from the following file:
 SyncWithDropbox.xml.txt
How it works.
KeePass will always have the latest data created on the PC in the 'KeePass Local DB'
and this cannot be overwritten by Dropbox. When KeePass synchronizes the
'KeePass Local DB' with the 'KeePass Master DB', Dropbox will migrate the changes
to the other PCs 'KeePass Master DB'.
KeePass on the other PCs will pick up these changes. Unless the databases on
multiple PCs change very often, Dropbox will eventually catch up.
The only way to lose data is if the same entry is changed on multiple databases before a Dropbox sync has occurred. KeePass is responsible for a reasonable behavior in this case (when such a conflict occurs, KeePass uses the latest data based on the last modification time and puts the other changes into history entries; details can be found on the synchronization help page).
Using multiple databases at the same time
KeePass can open multiple databases in individual tabs. With this feature you can open your personal database and have shared databases opened automatically – using the KeeAutoExec Plugin. When you lock KeePass you need to activate your personal database so that the correct master key is requested on unlock.
Activating a database on lock/close.
- Open KeePass and navigate to 'Tools' → 'Triggers...'.
- Add a trigger.
- Call it something meaningful, like 'Activate Master Database'.
- Tick the 'Enabled' and 'Initially on' boxes.
- Navigate to the 'Events' tab and add an event.
- Select 'Closing database file (before saving)'. Don't bother with the comparison or filter.
- Navigate to the 'Actions' tab and add an action.
- Select 'Activate database (select tab)'.
- In the 'File/URL' field enter the name of the database you wish to activate. There is no need to specify the full path, just the database name, e.g. Master.kdbx. This makes the trigger portable.
KeePass will now activate your master database when KeePass locks or you close one of your databases, and when you unlock KeePass you will be prompted for the key to your master database.
This trigger can also be imported from the following file:
ActivateDatabase.xml.txt
Saving automatically
These triggers make KeePass save automatically when a database change occurs. Auto-saving can be turned off/on using a button in the toolbar of the main window.
Auto-Type password only
Sometimes you only need to type the password, to unlock a previously used web page for example. This trigger provides a toolbar button to auto-type the password of the currently selected KeePass entry.
Auto-Type password button.
- Open KeePass and navigate to 'Tools' → 'Triggers...'.
- Add a trigger.
- Call it something meaningful, like 'Auto-Type password only Toolbar Button'.
- Tick the 'Enabled' and 'Initially on' boxes.
- Navigate to the 'Events' tab and add an event.
- Select 'Application started and ready'. Don't bother with the comparison or filter.
- Navigate to the 'Actions' tab and add an action.
- Select 'Add custom toolbar button'.
- Give it an ID, e.g. 'AutoTypePwOnly' and a name, e.g. 'Pass', for password – we don't want the button to be too long.
- Set the description to something meaningful, like 'Auto-Type password only'. This will show when you hover over the button.
- Add another trigger.
- Call it something meaningful, like 'Auto-Type password only Action'.
- Tick the 'Enabled' and 'Initially on' boxes.
- Navigate to the 'Events' tab and add an action.
- Select 'Custom toolbar button clicked'.
- Give it the same ID as step 9 above.
- Navigate to the 'Actions' tab and add an action.
- Select 'Perform autotype with selected entry'.
- Set the 'Sequence' to '
{PASSWORD}'.
To enter only a password, select the password field in your application/browser, switch to KeePass and highlight the required entry, then press the 'Pass' button. KeePass will drop to the background and type your password.
This trigger can also be imported from the following file
(see the instructions at the top of this page):
AutoType_PasswordOnly.xml.txt
Open database on-demand
Do you have client / other databases that you only need to open occasionally? Instead of using 'File' → 'Open', then hunting for the database and password, why not incorporate them into your own database with this trigger.
Note: This is a combined entry and trigger. You must have both for it to work.
Note 2: You cannot attach a key file to the KeePass entry to use to open the
database. If you want to have this arrangement, you will need to use the
KeeAutoExec plugin.
Note 3: You can use an encoded text version of a key file
in the entry used to open the database, without using KeeAutoExec.
See the section at the bottom of this item.
Create a KeePass entry.
- Open your master database and create an entry, e.g. "My_Project_DB".
- Enter a unique user name, e.g. "My_Project_DB_user" in the 'User name' field.
- Enter the external database's password in the password field.
- Enter the URL/path where the database is stored, in the URL field, e.g. "%USERPROFILE%\Documents\Projects\My_Project_DB.kdbx".
Create the associated trigger.
- Add a trigger (called something like "Open_My_Project_DB_with_a_password_reference").
- Make sure 'Enabled' and 'Initially on' are checked.
- Navigate to the 'Events' tab and add an event.
- Select 'Copied entry data to clipboard'.
- Set the 'Value - Comparison' to 'Equals'.
- Set the 'Value - Filter' to the user name you've set in the KeePass entry, e.g. "My_Project_DB_user".
- Navigate to the 'Action' tab and add an action.
- Select 'Open database file'.
- In the 'File/URL' field add a reference to the URL of the KeePass entry, e.g. "{REF:A@T:My_Project_DB}".
- In the 'Password' field add a reference to the password of the KeePass entry, e.g. "{REF:P@T:My_Project_DB}".
How it works.
Select the entry describing the "rarely used database" and
press Ctrl+B (Copy User Name),
or right-click on the entry and select 'Copy User Name',
which will activate the trigger and open your database.
The two attached files contain a sample entry and trigger. To import the trigger, see the instructions at the top of this page. To import the entry:
- Download the file 'Open_My_Project_DB.csv'.
- Select 'File' → 'Import'.
- Choose 'Generic CSV Importer'.
- Navigate to the file you downloaded in step 1 and select it.
- Accept the defaults to import the file.
The sample entry will appear in the root (top level) of your database.
Files:
Open_My_Project_DB.csv (sample entry),
Open_My_Project_DB.xml.txt (trigger).
Key file use in a trigger.
To use a key file instead of a password to open a database, without
using the KeeAutoExec plugin, the key file must be encoded as Base64
and added to the trigger.
Note: You can use a password and a key file, but you will have to put the
encoded key file information in the Notes field. Do not add anything
other than the encoded key file to the Notes field.
- Add the key file:
- Attach the key file to the KeePass entry. This is for safe keeping, it will not be used from here.
- Open a Base64 encoding page, e.g. J. Pillora's page and convert the key file to Base64
encoded text. It will look something like this:
data:application/octet-stream;base64,PD94b... - Paste the text into the Password field of the KeePass entry that you are using.
- Create the trigger:
Follow the procedure above, until you complete step 9.- In the 'Key file' field add a reference to the password of the KeePass entry, e.g. "{REF:P@T:My_Project_DB}".
Synchronize with Box.com
This trigger will synchronize on file save, or manually via a toolbar button, providing the Box.com credentials from a KeePass entry.
- Create a Box.com account, and store it in an entry in KeePass.
- Copy the UUID from the entry you just created.
- Open the attached XML file in an editor (Notepad, or Notepad++) and replace
all the instances of
REPLACE_WITH_DB_FILENAMEwith your local database filename, not including the path; e.g.Database.kdbx. - Replace all the instances of
REPLACE_WITH_BOX_UUIDwith the UUID from step 2. - Copy the entire XML text to the clipboard – Ctrl+A, Ctrl+C.
- In KeePass, under 'Tools' → 'Triggers', click the 'Tools' button and select 'Paste Triggers from Clipboard'.